
I am going to be completely honest with you. I was not always organized. In fact, I would say that you might define me as organized chaos. I knew where everything was and could pull it out or find it in a heartbeat but it did not look pretty or make much sense. My desktop was chaos, my closets, my life, my cupboards and let’s not even talk about my computer desktop and how I organized my thinking and digital files. On the surface, I was very organized but behind the closed doors was a mess. Ugh….I just didn’t know there was a better way….until I did. It all started with my childhood best friend, Laurel, who is known as the organization queen. She did all the Home Edit ideas before they were famous. She is that good!
Laurel decided to take me on as a project. I think it was because she saw me complaining all the time about how I wanted to be more organized, set up a system, and sustain it in my work and my personal life so that I never had to start from scratch again. I had been watching her for years and admiring her work and that really rubbed off on me. But where the real rubber hit the road was when she literally came into my house, my office, and my life and walked alongside me, step by step, decluttering, organizing stuff into bins, getting rid of things, and setting up a system so that a lot of my life could be automated. It changed everything! You guys, it also has lasted which is the best part! The catch is, it is A LOT of hard work up front, but the pay off once you set up your project management strategy is priceless.
This week, I want to focus on organizing and management….but not stuff. I want to talk about setting up a project management system that you can use over and over again in your personal and professional life so that you never have to start from scratch again. Listen, you do not have to be an expert in project management or super organized. This system is meant for people like I was a few years ago, just starting out, people like Laurel, who are organizing beasts, and to everyone in between. Trust me! You are going to love what I am about to share with you!
Just think about how maybe your leadership and business could be easier, more streamlined, more productive, and less stressful if you set up a system to get you more organized. Today I’m walking you through exactly how I learned from the best (my friend and Laurel and my mentor Amy Porterfield of course) how to set up project plans in my business, from the conceptualization of an idea of a project to the completion and even what we do to make it easy moving forward. This is not my own brilliant system, it comes from Amy Porterfield, but I wanted to share it with you so that maybe it could help you as much as it helped me in everything that I do.
I would like to focus on just one project plan that focuses on one project and show you how to put all the details, the action items, and every moving piece into a template so that you have everything in one place and you know what everyone is doing and you can set up deadlines so that it actually gets done. I got this definition of a project plan directly from Amy Porterfield herself. She says, “A project plan is essentially a process to get you from an idea or concept to bringing it to life by planning and organization through categories, individual tasks, assignees, due dates, and providing any necessary SOPs, standard operating procedures or resources, that are needed to support the completion of a specific task” (Porterfield, 2022).
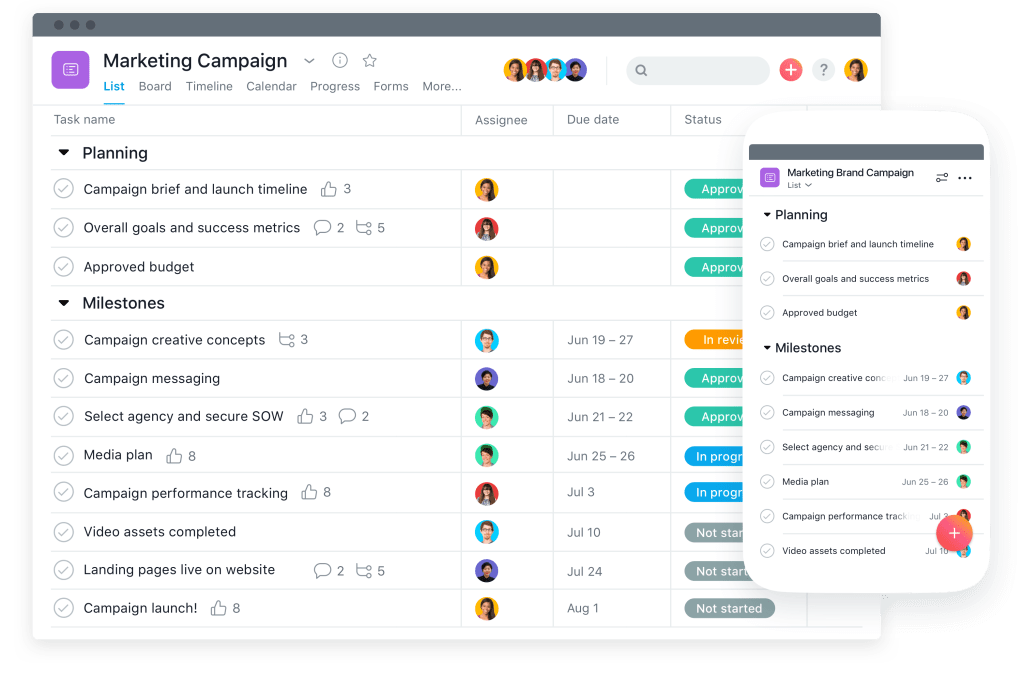
I used to hate google drive because I could never find anything in it. However, once I set up an organized system, I realize how effective and powerful it can be for collaboration and getting stuff done. So….I bring this up so that you know you can set up a project plan however you would like and using any type of forum that is familiar to you. I started out just using Google Docs and sometimes Google Spreadsheets, however, I need to admit, that I am not great at navigating any kind of spreadsheet. Now I use Asana, an online digital project management tool, for myself to keep me on track. I am new at using this program but I love it so far. Some day I would also like to get more of the people at my school using it too. Now let’s dive into how to set up a project plan to complete one specific task.
Step one: Identify the main focus of the project plan. In other words, what is the project and what is your outcome that you hope to achieve by the end of this project. So, for me, one way that I use a project plan is for this blog. The focus is actually getting one blog post out each week and bringing it to life from the ideas that I have brainstormed. I also use a project plan at my work as a school leader. I use it to design my professional development days or perhaps staff meetings. The outcome is to set up a roadmap and slides to make the learning as clear and effective as possible within the PD day and to come out with a powerful professional development presentation.
Step two: Outline your project. I used to be so guilty of just diving into a project with no real plan in place and see where I ended up. Well, sometimes it worked out and other times… not at all, and I ended up with a bunch of wasted time. The worst part about not outlining a roadmap for where you want to go is that you always have to start from scratch for new projects. If this is a project that you do over and over again, why not take time to really outline a roadmap and see the whole big picture of your project. This helps you to see where you might be going wrong, where you might be missing things, or where you really want to head. Amy Porterfield taught me to start with overarching categories. If I am using the Planning a PD Day example, I have the following, Slide Deck, Discussion notes, Templates, Obstacles that May Come Up, Flow of the Day.
Break Down The Steps Inside of Each Category. Once you have your overarching categories you are going to break it down even more. In fact, this has become my mantra for leadership….”How can I break this down even more?” In each category, break down all of the tasks and make a list of them. It is a simple, but necessary step. Think…”What are all the tasks that need to happen to make this category complete?” For the Slide Deck category in my Planning a PD example, I might include all of the planning needs which include brainstorming, the content, the layout, the expectations, the topics, the tasks. This is definitely the biggest category for me in this specific project plan. I come up with all of the ideas for the pd, I select which topics I really want to cover, I write the script and slide deck for the PD, I design the slides and the task the teachers will do.
If I used another category as an example, like the Templates category and I dug into the steps, I would have designed and created some templates, checklists, worksheets, to help teachers understand the content and be able to do more independent thinking and research to go along with the professional development. I would look at ways to have them reflect on the work that they did and set up action steps to sustain it in this section as well.
If I zoom out even more and look at the Discussion Notes category. I have things like slide notes written in to go with the slides, discussion prompts and perhaps some research articles that they might discuss. I would also have a category where I would figure out some unique and powerful ways to get teachers doing more talking, contributing their ideas, and engaging. Things like carousel approach, inside/outside circles, co-constructing criteria, etc.
The next category that I can set up steps to would be the Flow. This is where I would really examine the room I am presenting in and set up a goal to design the seating so that it is discussion based and free flowing. I would map out the room, set up sections in the day where I wanted the teachers to get up and move. Design materials and activities to get them flowing through the room and engaging and collaborating with each other. Or if they are on zoom, I would design how I would like to organize breakout rooms and how I might capture the conversation and residue of learning that happened.
These are just examples of one particular project plan that I have so that you can have more clarity on how a project management plan can really help. I used to just brainstorm all of the things that I needed to do in one giant heap and try to knock each task off one by one. This took way more time because it wasn’t organized into similar groups and it made it harder to remember everything. So come up with categories first and then break down the steps inside each one of them.
Step Three: Set Dates and Deadlines. Identify the most important dates inside of your project plan. This sets a deadline and creates a sense of urgency to actually make things happen. So for my PD Day Project Plan, the biggest date I have to worry about is when I actually have to present to the community who is learning from me. Every date inside of that big date has a little wiggle room but I want to make sure that I have that date in there. Set up all the mini dates next and put them in your calendar. It sets up a roadmap of expectations for the people who are also involved in the project to follow and they have a clear deadline to get the work done. Some mini dates that I set are dates that I review the content with my leadership team, deadlines for teachers to get their requests for learning into me, dates for the venue that I am using to present, etc. Make sure that each of these dates include the date that it is due. This is kind of like teachers who give students due dates with the purpose of having everything in before that deadline. This really sets up more productivity and efficiency.
Step Four: Identify Key Players. Once you have each of these dates and deadlines, assign an owner to each task. If you are a one woman or man show, then assign yourself lol. But a lot of time you have a lot of people involved so make sure that you set an owner to each task so they can see clearly what you are expecting them to do. For example, the review and research of the content are sometimes part of our leadership team’s job to review and collaborate one so their name would be placed beside that task. Hopefully you aren’t the owner of all the tasks!!! At this point, you get to assign these tasks out so that it all works like a well oiled machine.
Step Five: Finalize the outline and add any details, resources, or SOPs (standard operating principles) to each task. This one is a lot of work but it has been one of my favorites once I realized how effective this really is. I learned this all from Amy Porterfield but really this one was gave me the most bang for my buck. You’ll want to go into each task and give a little description, if needed, which will include any resources that person should check into, any links that they might need, and maybe a link to an SOP that can support that person in terms of how to get the task done. An SOP is basically how to do something. (Porterfield, 2022).
If I was assigning a teacher to lead a part of the pd using the Notability app on my ipad for his or her presentation so that she could move around the room or write on it as they go, and they didn’t know how to use it, I would tell them to check out the SOP on the project plan. This would be a step by step way to use Notability to present so that I didn’t have to spend the time teaching them. Now, I try to do an SOP for everything that I think might need it. Adding some description to the tasks is a game changer, and it will save you loads of time in the long run. It really gives you the power to hand of tasks confidentally and easier for someone to jump in and take over. It also teaches and empowers them as well. I try to do this even if it is just me on the project plan so that I always have an SOP just in case. I also use hyper links to the SOPs on the project plan so that everything is one place.
Step Six: Final Review of the Project and Check Ins. This is where you review your project management plan from top to bottom. Be sure to check in on a daily basis to see the progress and whether or not the work is actually happening.
Step Seven: Make A Copy Of The Project Plan So You Can Reuse It. You do not want all of this hard work to go to waste. Make a copy and reuse it over and over again and refine it to the current task.

Project plans are huge for productivity and efficiency and I am all about templates, plans, and roadmaps that create clarity for the work that needs to be done. We just went through the seven steps that I learned from Amy Porterfield about how to set up a project plan.
Here are your action steps. Choose one project that you do every year and set up a project plan using the seven steps. Start to build a template of SOP with a how to to do the more difficult tasks so that you can start to also build your SOP library to become even more efficient. I hope this outline helps in your future project planning!
I have the best free guide that teaches you how to set up a start up and shut down system to your day! You can download it here. I would also love to invite you to join our private facebook community called Principals and Leadership. My dream is to have a community of like-minded leaders who collaborate, learn from, and lift each other up. If that is you, join here now!
Porterfield, A. (2022). Project Planning Mastery. On-line Marketing Made Easy Podcast.

Thank you so much for sharing these 7 principles!
LikeLiked by 1 person